github
github 을 사용하다보면 회사와 개인 계정이 분리되어있어서 사용하는데 번거로운 경우가 있는데요. 로컬에서 push 하거나 pull할 때 저장소 권한이 없어서 막히는 경우가 있습니다.
github에 로그인 하는 방법이 https와 ssh 가 있는데 이 중에서 ssh 를 사용하면 편리하게 할 수 있습니다. https를 사용하지 않는 이유는 매번 회사 혹은 개인 깃헙 계정으로 웹 사이트 로그인을 해야하기 때문입니다.
ssh 자동화 스크립트
ssh 를 이용하여 회사와 개인 깃 계정을 분리하는 자동 스크립트를 만들었습니다. 아래에 이름 바꾸는 부분만 바꿔주신 후 사용하시면 됩니다.
#!/bin/bash

# 이름만 바꿔주면 돼요
PERSONAL_EMAIL="you@example.com"
WORK_EMAIL="you@company.com"
PERSONAL_NAME="yourusername"
WORK_NAME="yourcompany"

# 1. SSH 키 생성
echo "🔑 Generating SSH keys..."
ssh-keygen -t ed25519 -C "$PERSONAL_EMAIL" -f ~/.ssh/id_ed25519_personal -N ""
ssh-keygen -t ed25519 -C "$WORK_EMAIL" -f ~/.ssh/id_ed25519_work -N ""

# 2. SSH Config 파일에 Host alias 추가
echo "⚙️ Updating ~/.ssh/config..."
cat <<EOF >> ~/.ssh/config

# Personal GitHub
Host github-personal
  HostName github.com
  User git
  IdentityFile ~/.ssh/id_ed25519_personal
  IdentitiesOnly yes

# Work GitHub
Host github-work
  HostName github.com
  User git
  IdentityFile ~/.ssh/id_ed25519_work
  IdentitiesOnly yes
EOF

# 3. SSH Agent 등록 (macOS/Linux 공통)
echo "🚀 Adding SSH keys to ssh-agent..."
eval "$(ssh-agent -s)"
ssh-add ~/.ssh/id_ed25519_personal
ssh-add ~/.ssh/id_ed25519_work

# 4. 키 확인 안내
echo "📋 Copy the following keys and add them to GitHub:"

echo "🔐 Personal:"
cat ~/.ssh/id_ed25519_personal.pub
echo ""
echo "🔐 Work:"
cat ~/.ssh/id_ed25519_work.pub
echo ""
echo "👉 Add these keys at https://github.com/settings/keys (각 계정마다 로그인해서)"

# 5. gh auth login 안내
echo ""
echo "🧪 Now login to GitHub CLI for each account:"
echo "👉 Personal account: gh auth login --hostname github-personal"
echo "👉 Work account: gh auth login --hostname github-work"
사용 방법
- 실행 권한 부여
nano setup_ssh_accounts.sh
# 붙여넣기 후 저장 (Ctrl+O, Enter → Ctrl+X)
- 실행
./setup_ssh_accounts.sh
- ssh 생성 위 파일 실행으로 생성된 ssh 키들을 회사와 개인 계정에 접속해 https://github.com/settings/keys 페이지로 들어가서 new SSH key 를 클릭해 새로운 ssh key를 만들어줍니다.

- remote 저장소 url 변경
// 개인
git remote set-url origin git@github-personal:yourusername/my-repo.git

// 회사
git remote set-url origin git@github-work:yourcompany/project.git
이제 각 저장소에서 기존에 https 로 remote 저장소가 연결되어있던 부분들을 ssh 형태의 remote url로 바꿔줍니다.
- 확인
이렇게 한 후에 정상적으로 ssh가 적용되었는지 확인하려면 아래 명령어를 입력합니다.
ssh -T git@github.com
아래와 같이 나오면 정상 적용된 것입니다. 만약 Permission denied가 뜬다면 → GitHub와 연결이 안 된 것입니다.
Hi yourusername! You've successfully authenticated, but GitHub does not provide shell access.
올바른 키가 등록되어 있는지 확인하려면
ssh-add -l
이 결과에 id_ed25519_personal 또는 id_ed25519_work 가 없으면 아래 명령으로 추가해 주세요:
ssh-add ~/.ssh/id_ed25519_personal
ssh-add ~/.ssh/id_ed25519_work
~/.ssh/config에 alias 설정 제대로 했는지 확인하려면
cat ~/.ssh/config
아래처럼 나오면 정상 적용된 것입니다.
Host github-personal
  HostName github.com
  User git
  IdentityFile ~/.ssh/id_ed25519_personal
  IdentitiesOnly yes
여기까지하면 회사 계정과 개인 계정을 동시에 사용할 수 있지만 만약 회사가 SSO 로그인을 하도록 설정되어있다면 아래와 같은 에러가 발생합니다.
ERROR: The 'organization' organization has enabled or enforced SAML SSO.
To access this repository, you must use the HTTPS remote with a personal access token or SSH with an SSH key and passphrase that has been authorized for this organization.
Visit https://docs.github.com/articles/authenticating-to-a-github-organization-with-saml-single-sign-on/ for more information.

fatal: Could not read from remote repository.

Please make sure you have the correct access rights
and the repository exists.
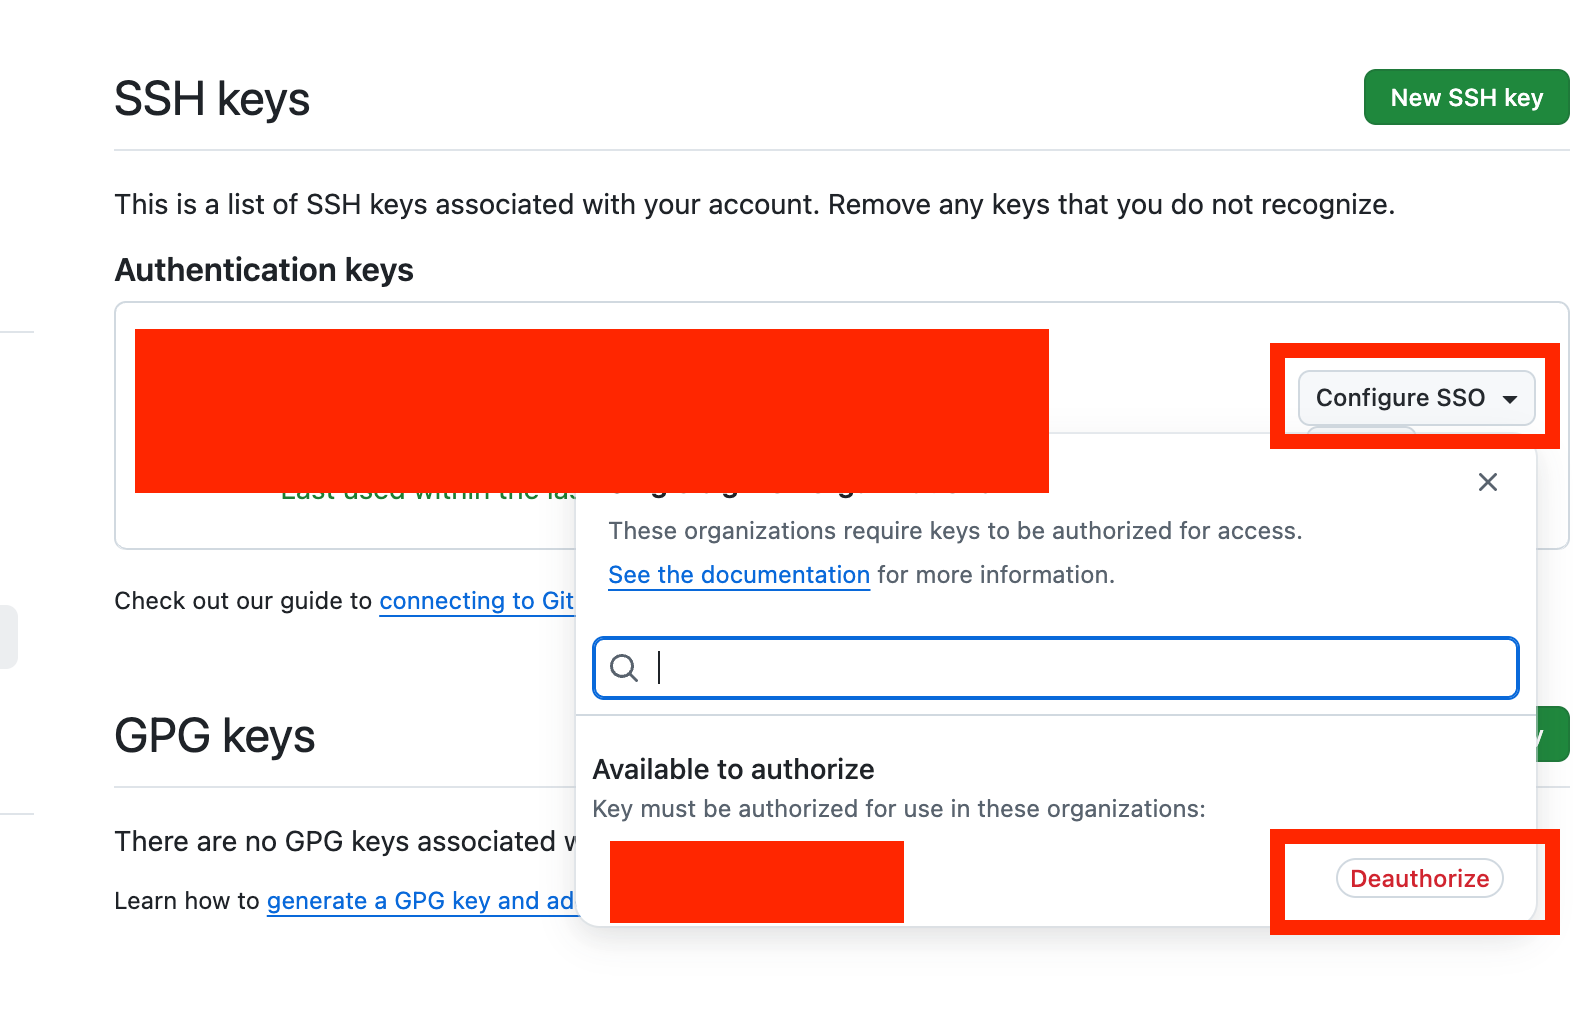
이런 경우에는 회사 organization에서 ssh를 승인 해야합니다.
https://github.com/settings/keys 다시 key 페이지로 들어가서 아래 사진의 configure SSO를 클릭한 후 authorize를 눌러서 활성화를 시켜줍니다.